Installation and Setup
Setting up GoCSM involves configuring your HighLevel account and then connecting it to GoCSM. Follow these steps carefully to ensure a smooth setup process.
Important Setup Steps Before Using GoCSM
Before you start using GoCSM, you need to configure some essential settings in your HighLevel account:
1. Setup Your Business Profile
- Navigate to Settings > Business Profile in your HighLevel account.
Add the following information:
Your company logo
Company name
Business/support email
Phone number
Branded domain
2. Configure Email Sending Domain
- Go to Settings > Email Services in HighLevel.
- Add your sending domain to match your company/support email. This improves email deliverability.
3. Purchase a Phone Number
- Navigate to Settings > Phone Numbers in HighLevel.
- Purchase a support phone number. This will be used for SMS confirmations, notifications, and reminders.
Now that your basic HighLevel settings are configured, let's set up GoCSM:
- Log in to your GoCSM account.
- Go to the Dashboard and select the "Setup GoCSM" dashboard.

Step 1: Custom Links
You'll need to set up several custom links to enable various GoCSM features:
Support Feedback Form Link:
In GHL, go to Sites > Forms > Builder
Copy the Support Feedback preview link
Paste it into the corresponding field in GoCSM
Task Form Link:
In GHL, go to Sites > Forms > Builder
Copy the Task Form preview link
Paste it into the corresponding field in GoCSM
Success Session Calendar Link:
In GHL, go to Settings > Calendars
Activate the Success Session calendar
Copy its permanent link
Paste it into the corresponding field in GoCSM
Feature Walkthrough Calendar Link:
In GHL, go to Settings > Calendars
Activate the Feature Walkthrough calendar
Copy its permanent link
Paste it into the corresponding field in GoCSM
Affiliate Sign-Up Link (if applicable):
If you're offering an affiliate program (e.g., through First Promoter), paste the signup link in the designated field
Step 2: Integration
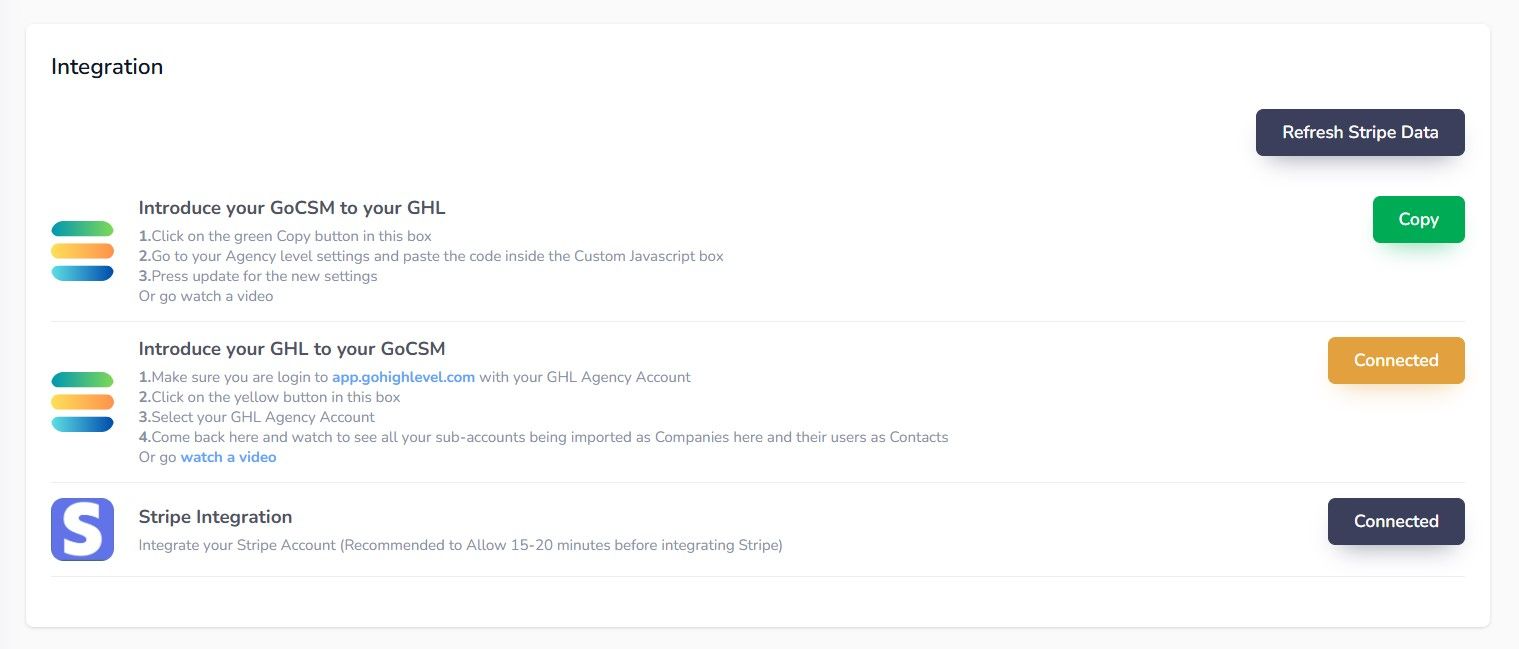
Follow the integration instructions provided on the Setup GoCSM Dashboard.
Connect your HighLevel account to GoCSM as directed.
Important: After connecting HighLevel to GoCSM, wait 20 minutes before proceeding to the next step.
Step 3: Connect Stripe and Configure Plans
After waiting 20 minutes, log back into your GoCSM Setup Dashboard.
Connect your Stripe account as prompted.
Configure your service plans:
Navigate to Plans Configurations > Services > Add New
Add all the services that you offer in your agency (e.g., Dashboard, Automations, Marketing)
Set up your plan details:
Go to Plans & Packages > Configure
For each plan:
Select a color
Add the services included in that plan
Specify CSM hours allowed (if applicable)
Save your configurations
Final Steps
Congratulations! You've completed the setup process for GoCSM. Here are a few final notes:
Double-check that all integrations are working correctly
Familiarize yourself with the GoCSM dashboard and features
If you need any assistance, email [email protected]
Remember, GoCSM is designed to enhance your customer success management within the HighLevel ecosystem. Take some time to explore the features and how they can benefit your agency and customers.
Next Stage:
Was this article helpful?
That’s Great!
Thank you for your feedback
Sorry! We couldn't be helpful
Thank you for your feedback
Feedback sent
We appreciate your effort and will try to fix the article